How i made these images-
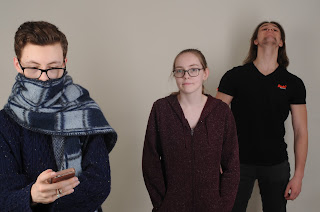
These images were taken in the colleges studio with a light box, a reflector and several other artificial lightings with a white and pink back-drop. The images were taken to show the change of aperture, focus and depth of field in an image. To focus on a singular point more than the other, although the subject is similar to 'Bokeh' instead of the whole foreground and background being out of focus in this subject of 'aperture' only one part is singled out. Which then makes it clearer to find the main focus in the blur of the background - In bokeh the background is out of focus is not unable to be identified, however in 'aperture' the background is only slightly out of focus which is good as it shows the change between the depth a lot easier to identify.
However one image was not taken in the studio and was taken on the college's grounds, to take this i used natural lighting and a hand-held camera, i manually adjusted the aperture to get the effect i desired.
Image one -
This image was taken outside college with a hand-held camera. The camera was set to automatic focus so I didn't adjust the aperture. To edit this i used the 'Black and White' tool on photoshop. I cropped the image down so that the image was a lot more compressed and the branch was the main focus of the image with a severely blurred background. I later 'burned' some of the darker areas of the image so that the image would have a harsher depth of focus giving the image a lot more texture.

Image Two-
This image was taken outside college with a hand-held camera. The camera was set to automatic focus so I didn't adjust the aperture. To edit this i used the 'Black and White' tool on photoshop. I cropped the image down so that the image was a lot more compressed and the branch was the main focus of the image with a severely blurred background. I later 'burned' some of the darker areas of the image so that the image would have a harsher depth of focus giving the image a lot more texture.

Image Two-
Image two was taken in the studio with a white back-drop. Using a tripod that was adjusted to fit each one of the models heights. I decided to use Tim as the main focus of the image as his bright scarf drew the most attention to the image. Nabil's t-shirt gave a pop of colour to the background as the focus was muted on Nabil i believed the change of focus worked extremely well as although you are drawn to Tim due to his instant focus, Nabil's presence is seen due to the red colour standing out. To edit this image i used the brightness tool in Photoshop which seemed to give the image a clearer projectivity.
Image Three-
Image three was used for experimental purposes to see if we could manage to have two people at different points in the image to both be in focus and have Nabil in the background. Successfully it worked. The only negative is how distant model 1 and model 2 are , I would of preferred Model 2 to stand closer to Model 1 rather than Model 3. To edit this image i again, used the 'brightness' tool which emphasised the images cleanliness and darkened and defined the shadows.
Image Four-
In image four we used the pink back-ground in the other half of the studio to create a definition. In this image we used a tripod again however adjusted it to be a head-shot. I adjusted the aperture to f/22 to get a deeper depth of field. In this image there seems to be a lot more shadows than there really is which i like, to get this i edited it by adjusting the 'brightness' and 'contrast' levels.
Image Five-
In image five I attempted to make both of the models bodies to be in focus, however unfortunately that wasn't the case as that only occurred on model 2 as model 1 was standing too close to the camera. However, this is one of my favourite images due to the diversity of it. To edit this i used the 'Black and White' tool, i then later used the 'Burn' tool to emphasise the darkness levels and then as i wasn't satisfied with the contrast between the light and dark, i edited the 'brightness and contrast' levels which rewarded me with this black and white almost grainy image.


A good blog post here well done, further additions to this post may be required with regards to recognising how the lighting set-up and equipment affects the way the images look... I would suggest that you try to work on your terminology as the light box is actually a "softbox" which refers to the tent like device attached to the light source. For each photograph you should be referring to the camera settings used and discus how the choice of aperture affected the final image.. that being said Shannon, well done, this is a good blog post.
ReplyDeleteshoot 4 i think you have got the camera settings mixed up? it could be f4. as nail is clearly out of focus... shoot 5 might be f22 as the two subjects are in focus.. you have some really good pictures here.. Please consider them for the final portfolio.
ReplyDelete